代码位置
教程被应用在MediaStateT中
- MediaStateT Github项目地址: https://github.com/taxue-alfred/MediaStateT
- MediaStateT Gitee项目地址: https://gitee.com/MediaState/MediaStateT
带图片的弹窗,有物理弹跳效果
最近看到MAC上的网易云音乐播放音乐切换歌曲的时候会有一个弹窗,个人感觉这功能挺不错的,但是Windows却没有这个功能,所以就想着去实现一下,正好加一些功能,再和单片机做配合做成一整个体系算了。
效果展示
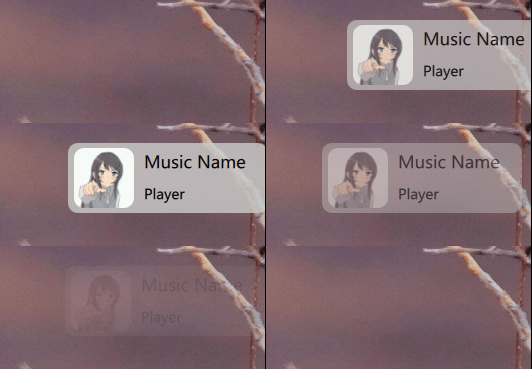
窗口调用
PopWindow使用Loader控件进行了模块化,非常好用,可以随便在Loader里面添加控件
> 需要注意的是,添加到Loader中的控件id不能被外部所访问,所以建议在外部先加载好控件然后传递到Loader
- 直接在
source_component添加Conponent控件即可
> 需要注意的是Component只能有一个控件,所以建议先创建一个大的Rectangle 然后再在Rectangle里面创建其他控件,最后传递Component也就传递了 Rectangle及其整个界面
代码参考
整体的代码不是很难,必要的注释都写在代码里了。需要注意的是:
PopWindow.qml的Window属性的xy可以被外部调用的时候被覆盖- 窗口的大小根据
Loader里面content_loader的内容大小改变 sign这个变量只是一个标志,为了防止动画被多次执行
//PopWindow.qml
import QtQuick
import QtQuick.Controls 2.5
import QtQuick.Window 2.3

Window{
    id: pop_window
    visible: false
    color: "transparent"
    // 透明度
    opacity: 0
    // 取消边框
    flags:Qt.FramelessWindowsHint | Qt.ToolTip
    // 设置为非模态
    modality: Qt.NonModal
    //设置初始位置(外部设置会覆盖此设置)
    x: Screen.width - content_loader.width
    y: 100
    //根据Loader设置大小
    width: content_loader.width
    height: content_loader.height

    MouseArea{
      id:content_mouse
      anchors.fill: parent
      hoverEnabled: true
    }

    // 设置出现后显示时间的计时器
    Timer{
      id:show_timer
      interval: 2500
      repeat: true
      onTriggered:{
	  //这个if实现了鼠标悬停保留窗口的效果
	  if(!loader_mouse.containsMouse){
	      hideWindow();
	  }
      }
    }

    //绘制图形的Loader,供外部使用
    property alias source_component:content_loader.sourceComponent
    Loader{
      id:content_loader
      MouseArea{
	  id:loader_mouse
	  anchors.fill:parent
	  hoverEnabled:true
      }
    }

//---------------------------动画部分开始-------------------
    //设置出现显示动画
    property int x_offset: 0
    //设置sign标志,防止多次showWindow调用造成多次动画显示
    property int sign: 0
    ParallelAnimation{
      id: show_anim
      // 透明度动画
      PropertyAnimation{
	  target:pop_window
	  property: "opacity"
	  easing.type: Easing.InQuart
	  from:pop_window.opacity
	  to: 1
	  duration:350
      }
      //位置移动动画
      PropertyAnimation{
	  target:pop_window
	  property: "x"
	  easing.type: Easing.OutBounce
	  //从当前值开始移动
	  from: Screen.width
	  to: pop_window.x - content_loader.width - x_offset
	  duration:800
      }
      onStarted:{
	  pop_window.show()
      }
      //出现动画结束信号
      onFinished:{
	  show_timer.start()
      }
    }
    //设置关闭显示动画
    ParallelAnimation{
      id: hide_anim
      // 透明度动画
      PropertyAnimation{
	  target:pop_window
	  property: "opacity"
	  easing.type: Easing.OutCubic
	  from:pop_window.opacity
	  to: 0
	  duration:800
      }
      //位置移动动画
      PropertyAnimation{
	  target:pop_window
	  property: "x"
	  easing.type: Easing.InExpo
	  //从当前值开始移动
	  from: pop_window.x
	  to: Screen.width
	  duration:800
      }
      //结束动画结束之后隐藏窗口
      onFinished:{
	  show_timer.stop();
	  pop_window.hide();
      }
    }

    //显示弹窗
    function showWindow(){
      if(sign === 0){
	  show_anim.start()
	  sign = 1
      }
    }

    //隐藏弹窗
    function hideWindow(){
      if(sign === 1){
	  show_anim.stop()
	  hide_anim.start()
	  sign = 0
      }
    }
//---------------------------动画部分结束-------------------
}
调用:
//main.qml
import QtQuick
import QtQuick.Controls 2.5
import QtQuick.Window 2.3
import Qt5Compat.GraphicalEffects

Item{
    Timer{
      interval:500
      repeat:false
      running:true
      onTriggered:{
	  pop.showWindow();
      }
    }

    PopWindow{
      id:pop
      // 设置初始位置,对PopWindow里面的x,y进行了覆盖
      x: get_screen_pixel(1, Screen.width)
      y: get_screen_pixel(0.13, Screen.height)
      x_offset: get_screen_pixel(0.005, Screen.width)
      source_component:
	  Component{
	      id:test_component
	      Rectangle{
		  id:bk_rectangle
		  width:200
		  height:70
		  radius:10
		  color: Qt.rgba(0.8,0.8,0.8,0.8)

		  Image {
		      id: img
		      width: 60
		      height: 60
		      anchors.verticalCenter: parent.verticalCenter
		      anchors.left: parent.left
		      anchors.leftMargin:6
		      source: "/album.jpg"
		      smooth: true
		      mipmap:true
		      visible: false
		      cache:false
		  }

		  Rectangle {
		      id: img_mask
		      width: img.width
		      height: img.height
		      radius: 10
		      color: "red"
		      visible: false
		  }

		  OpacityMask {
		      anchors.fill: img
		      source: img
		      maskSource: img_mask
		  }

		  Text{
		      id:music_name_label
		      width:110
		      anchors.verticalCenter: parent.verticalCenter
		      anchors.verticalCenterOffset: -16
		      anchors.left:img.right
		      anchors.leftMargin:10
		      font.pixelSize: 17
		      text:qsTr("Music Name")
		  }

		  Text{
		      id:player_name_label
		      width:110
		      anchors.verticalCenter: parent.verticalCenter
		      anchors.verticalCenterOffset: 16
		      anchors.left:img.right
		      anchors.leftMargin:10
		      font.pixelSize: 14
		      text:qsTr("Player")
		  }
	      }
	  }
      // 为了适应不同的屏幕,需要使用百分比表示
      function get_screen_pixel(percent, sum_pixel){
	  return percent * sum_pixel
      }
    }
}
参考
Image控件图片的更新以及相对路径的访问
问题描述:
Image控件在重新对source赋值的时候,如果路径未发生改变,那么就会使用缓存区的图片。Image的source属性应该使用绝对路径,使用qrc:会被编译到char数组中,更别提什么更改了
> 这里对qrc的部分问题写的比较明白了: QT中添加的资源文件qrc时的路径问题小结
解决方案:
使用 file:YourFilePat
> 如果是绝对路径就需要用 file:///YourAbsolutePath
比如我的Image控件的 id:img ,那么先关闭它的缓存功能: cache:false
然后,在你需要对其进行图片更改的时候:
//由于QtImage存在缓存机制,需要cache:false并且先置空路径再设置路径才会加载图片,不改变路径直接调用上次的缓存
img.source = ""
img.source = "file:./YourImage.jpg"
参考
模块Qt5 Compat.Graphical Effects没有安装
问题引出
环境:Qt6.2.2 | MinGw10.0.0
先来看看我的qml文件中import部分
//PopWindow.qml(下图可以看到我这个文件第四行报错)
import QtQuick
import QtQuick.Controls 2.5
import QtQuick.Window 2.3
import Qt5Compat.GraphicalEffects

import qt.txwh.MT_info_get 1.0

emm,网上查询好久无果,但是在
http://andersjing.com/2017/05/11/2017-05-11-qt_release/ 中找到了零星的几句话引起了我的注意 复制qml模块的dll需要将该模块下的qmldir文件一起复制过去,不然依然找不到对应的模块。 所以我立马打开了windeployqt之后的文件夹找到 Qt5Compat>GraphicalEffects 文件夹,一看好家伙,windeployqt
你怎么回事?

> 可以看到只有一个private文件夹,没有对应的qmldir和动态库dll
解决思路
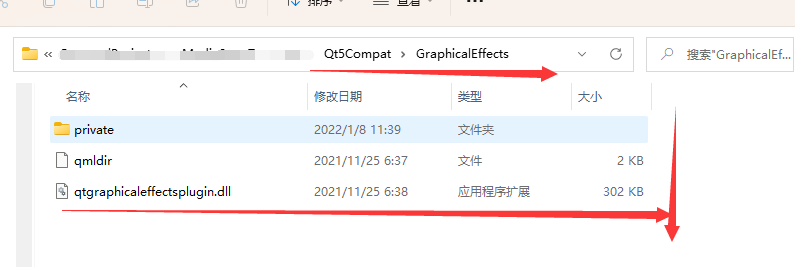
问题找到了,那么我们找到Qt的开发环境目录,把文件 qmldir qtgraphicaleffectplugin.dll 复制进去就好了
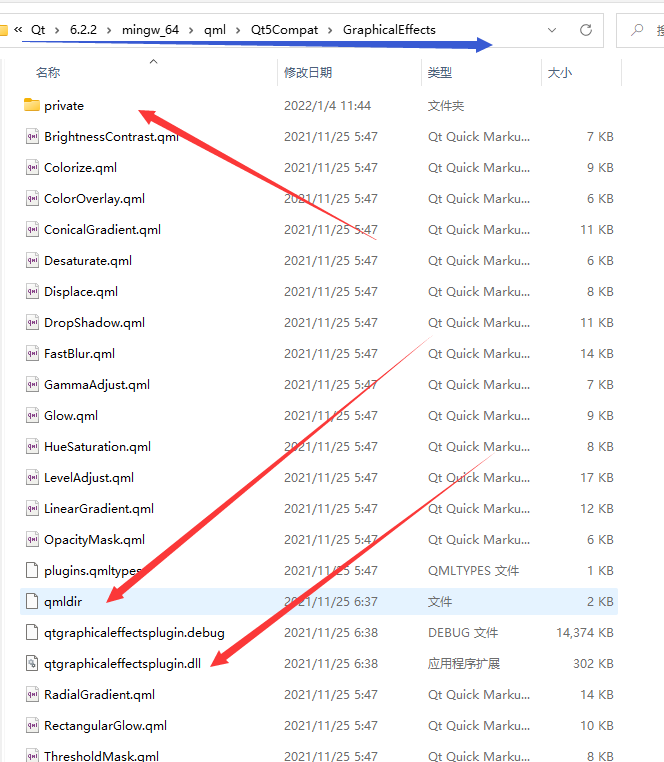
复制之后来看看输出文件夹的组成
嗯~,我们运行下exe来试试
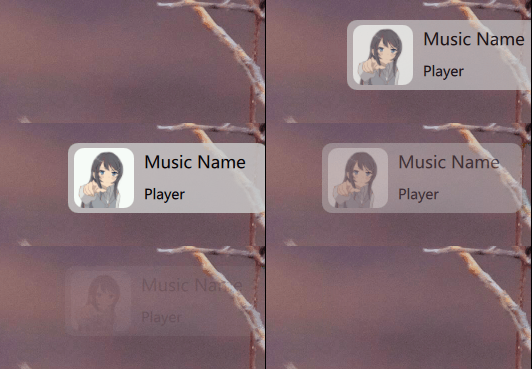
可以看到不报错,动画也很好看(GIF有点掉帧,其实比这个流畅很多),非常nice
参考
全局热键的实现
问题引出
网上查了查找了找关于QML的全局热键相关,发现有叫Shortcut和Action的控件,但是我写到QML里面以后根本没有效果,前者还有一个叫
Qt.ApplicationShortcut 属性,试了之后也无果。后者的Focus方案也无果。。所以看了看官方的API:
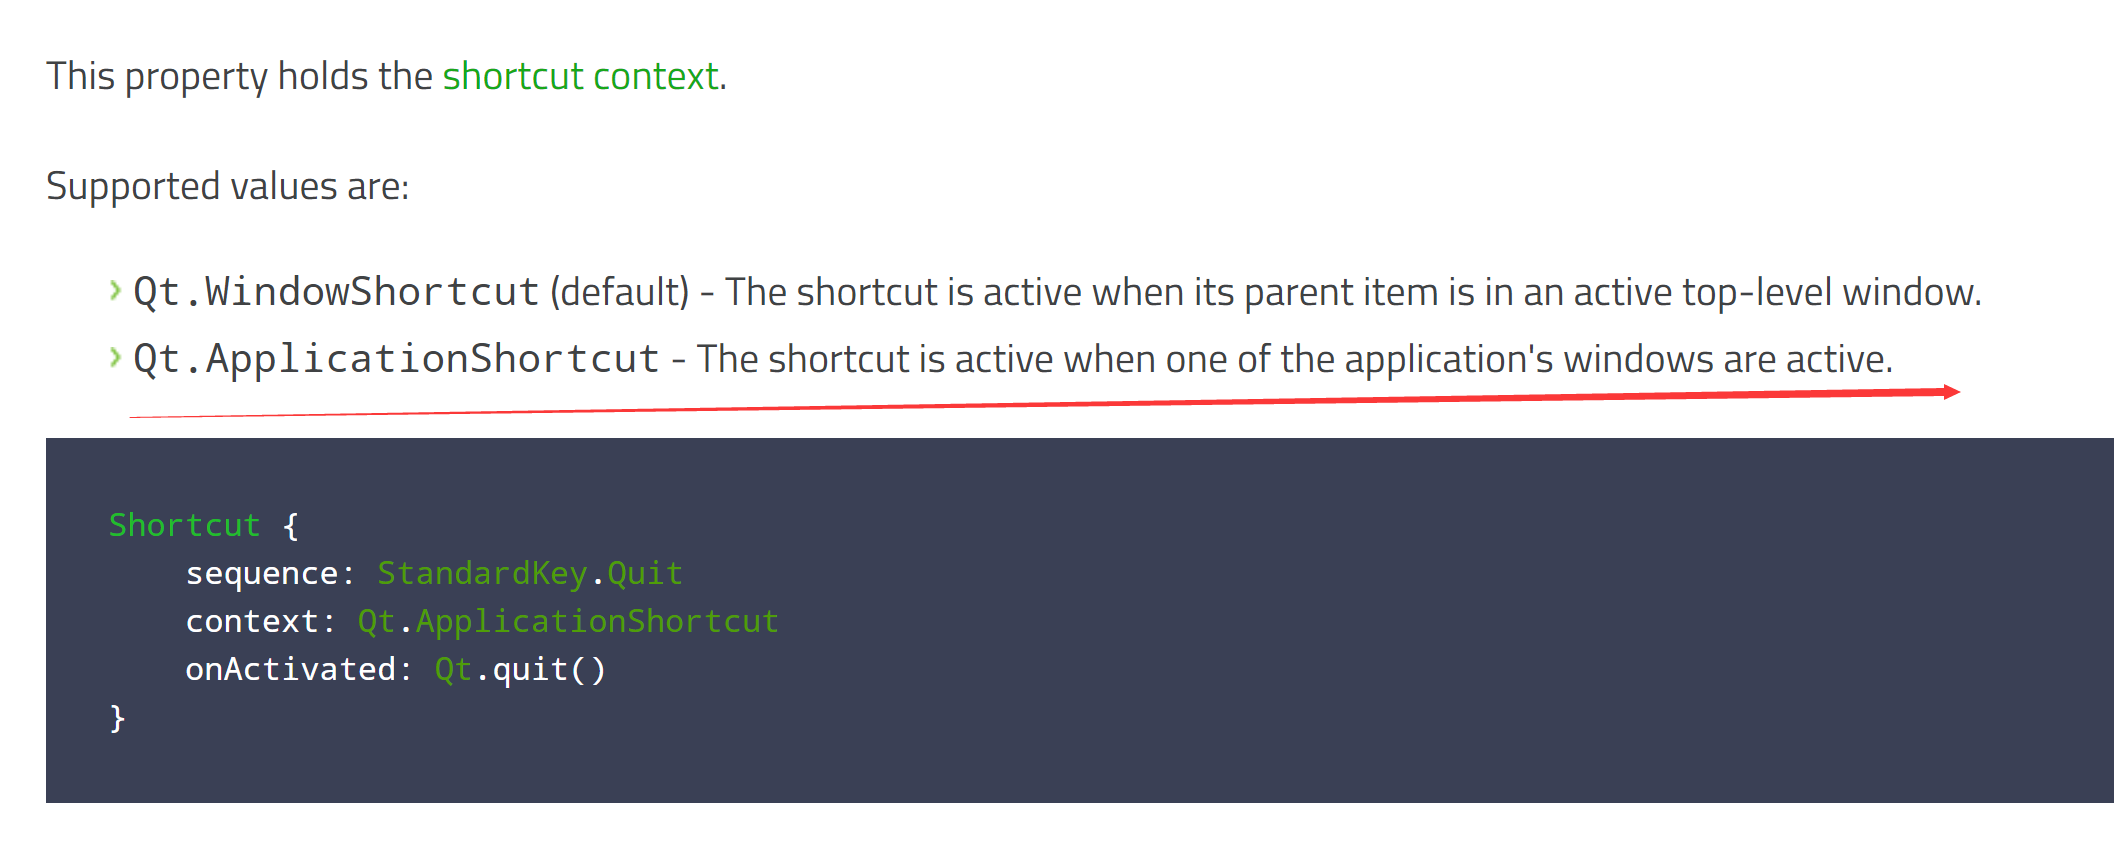
> 官方说要求必须有一个活动的窗口。。
然而我实现的窗口是这样的:

> 这个窗口效果我之前写过一个博客: [Qt6][QML][教程]QML创建带图片的物理弹跳-快速隐藏效果的弹窗
解决
这个窗口被隐藏了,没有可以活动的窗口,没效果也正常。。。利用C++解决办法:
- 那既然我们没有办法通过QML去实现,那么我们换一种思路,用C++实现然后发送信号给QML不就Ok了?既然目标明确,那就开搞。网上找了找发现了一个叫 Qhotkey的东西。
> 还有就是可以调用WindowsAPI 的 RegisterHotKey 函数Qhotkey是一个跨平台的全局热键库,,里面在Windows平台的实现就是通过 RegisterHotKey 函数去实现的.我在代码里标注出来了: QHotkey
以下为具体的实例:
//Class.h
signal:
      void hot_key_activated(int value);
public slots:
      void hot_key_call();
//Class.cpp
QHotkey * hotkey1 = new QHotkey(QKeySequence("Ctrl+1"), true);
//和槽函数连接
QObject::connect(hotkey1, &QHotkey::activated, this, &YourClass::hot_key_call_1);
槽函数实现:
//Class.cpp
void MT_info_get::hot_key_call_1() {
    emit hot_key_activated(1);
QML端就直接注册类导入后相应信号然后调用窗口出现的函数就可以: QML怎么注册C++的类这里不再赘述,自行查阅
//project.qml
onHot_key_activated:
      //Qt6需要这么去写,qt5不需要加function()
    function(value){
      if(value == 1){
	  pop_window.showWindow()
      }
    }
PS:由于我使用的是Clion的Qt开发环境,Clion使用camke编译文件因此我们需要在CmakeLists.txt添加需要编译的cpp文件和导入Qhotkey的头文件
> 其实官方有提供Cmake的编译指令,但是我编译之后多次出错,所以直接把源文件加到我项目的CmakeLists.txt了。使用qmake的同学直接按照官方的教程导入pri文件就好
// 添加头文件
include_directories("Libraries/QHotkey/QHotkey")
//添加cpp文件进行编译
add_executable(MediaStateT
      Libraries/QHotkey/QHotkey/qhotkey.cpp
      Libraries/QHotkey/QHotkey/qhotkey_win.cpp)
这里如果在其他平台使用camke则需要进行修改:
- macos:将qhotkey_win.cpp更换为qhotkey_mac.cpp
- Linux:将qhotkey_win.cpp更换为qhotkey_x11.cpp
然后大功告成!
参考
主窗口隐藏后子窗口关闭导致程序关闭的问题
问题引出
前几节讲到,我们实现了如下的窗口效果:

这个弹出的界面是主窗口,我们需要在此之上弹出一个新的窗口。但是随即发现一个问题。先来看看主窗口隐藏的代码:
//结束动画结束之后隐藏窗口
onFinished:{
    show_timer.stop()
    pop_window.hide() //这一行隐藏了窗口
}
> 可以看到这一行把主窗口在动画结束之后进行了隐藏。
我们此时创建新的窗口。但是当新建的窗口被关闭之后,发现整个程序被退出,随即发现程序的析构函数被执行。
> 于是总结出:当主窗口不处于活跃状态的时候,子窗口关闭会执行析构函数
解决思路
那么怎么解决?我们换个思路==> 既然想要达到隐藏效果,那么我们将主窗口的宽高设置为0,0是不是也可以达到隐藏的效果呢?我们来试一试:
//新建一个函数,pop_window指的是主窗口的动画模块,参照我前面的教程就知道这个模块具体是干嘛的了,这里不再赘述
function disattack(){
      pop_window.width = 0
      pop_window.height = 0
    }
然后我们来修改onFinished这个信号被触发时执行的语句:
//结束动画结束之后隐藏窗口
onFinished:{
    show_timer.stop()
      pop_window.disattack()
}
当然,在下次需要弹出的时候还需要恢复其原来的宽高:
//显示弹窗,这里函数我前面的教程也有写,这里不再赘述。
function showWindow(){
    if(sign === 0){
      //恢复大小
      //content_loader为Loader的ID
      pop_window.width = content_loader.width
      pop_window.height = content_loader.height

      show_anim.start()
      sign = 1
    }
}
按照这个思路,下次子窗口关闭之后主窗口如果被关闭就可以考虑你是不是隐藏了主窗口造成的。
评论
其实找下帮助文档就好了,QGuiApplication中有个属性 QuitOnLastWindowClosed,默认为true,设置为false就好了
参考
QML使用ChartView导致程序闪退问题
问题引出
QML文件中直接使用ChartView:
ChartView{
	  id:left_shake
	  title: qsTr("左声道")
	  Layout.minimumWidth:320
	  Layout.minimumHeight:240
	  antialiasing:true
	  legend.visible:false
    ······
}
然后程序只要一使用这个就老是闪退。。于是我Google了下,只能说 StackOverFlow很强
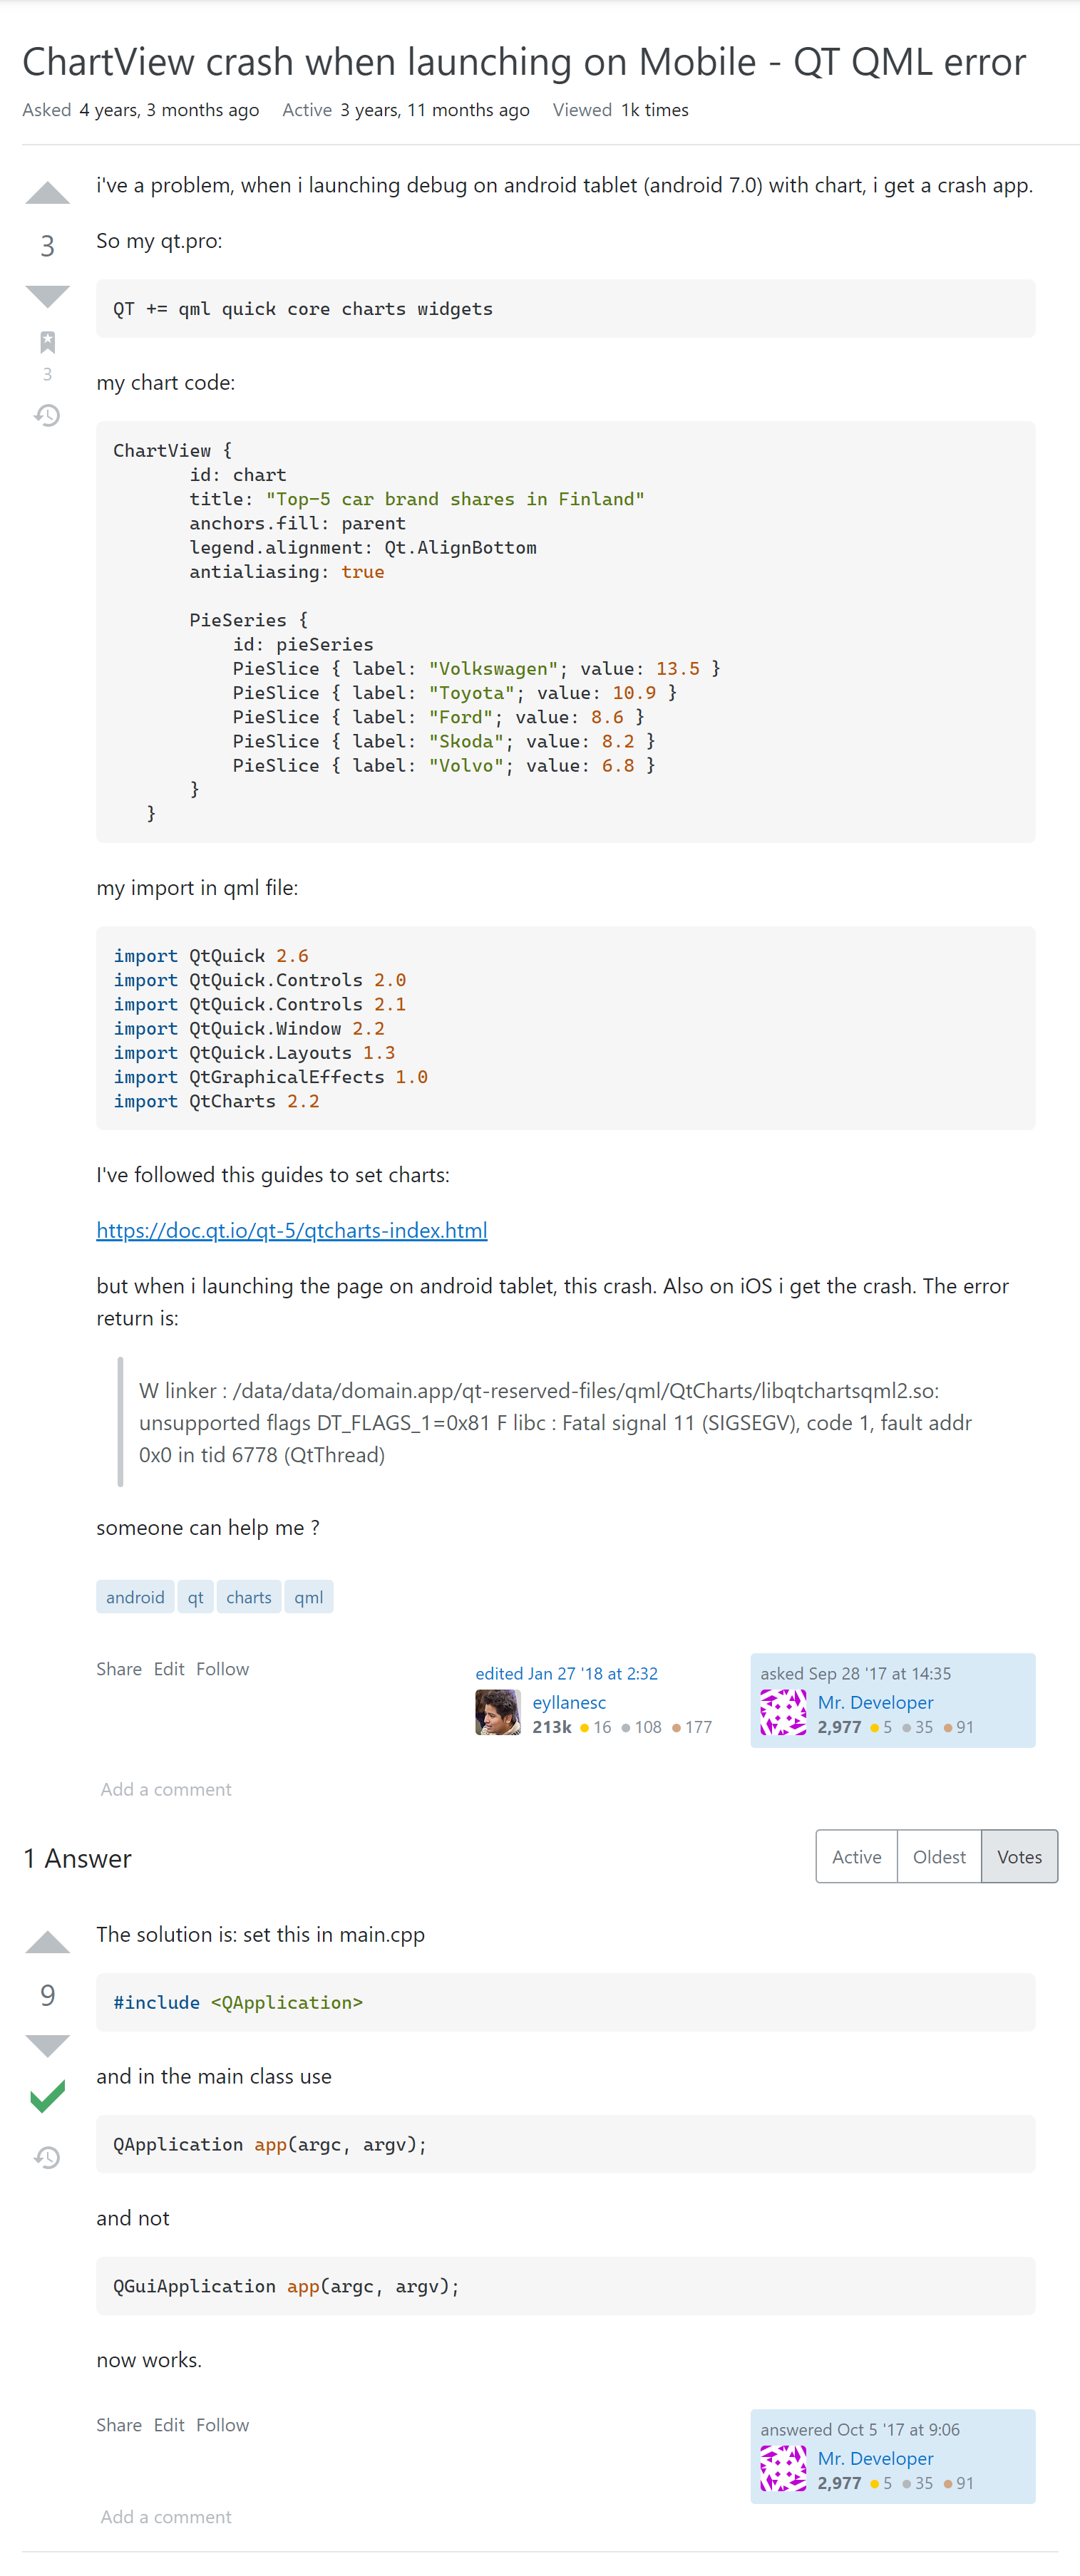
ChartView crash when launching on Mobile - QT QML error
问题解决
IDE自动创建main.cpp代码的时候会创建部分代码,这里使用的是 QGuiApplication
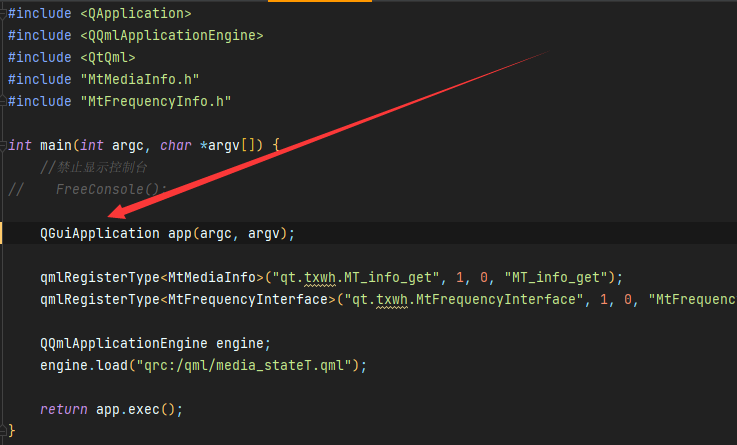
所以我们照着改。。改好之后发现。。
ChartView确实是可以用了,但是MenuItem(托盘右键菜单)为什么用不了了??
下一节我们就来讲讲怎么整MenuItem这个鬼问题。。。。(挺麻烦的。。)
参考
自定义一个漂亮的托盘右键菜单
问题展示
上节我们讲到,我们在修复了ChartView导致程序崩溃的问题之后,又导致了 MenuItem托盘右键菜单无法使用的问题。今天我们就来解决这个问题。
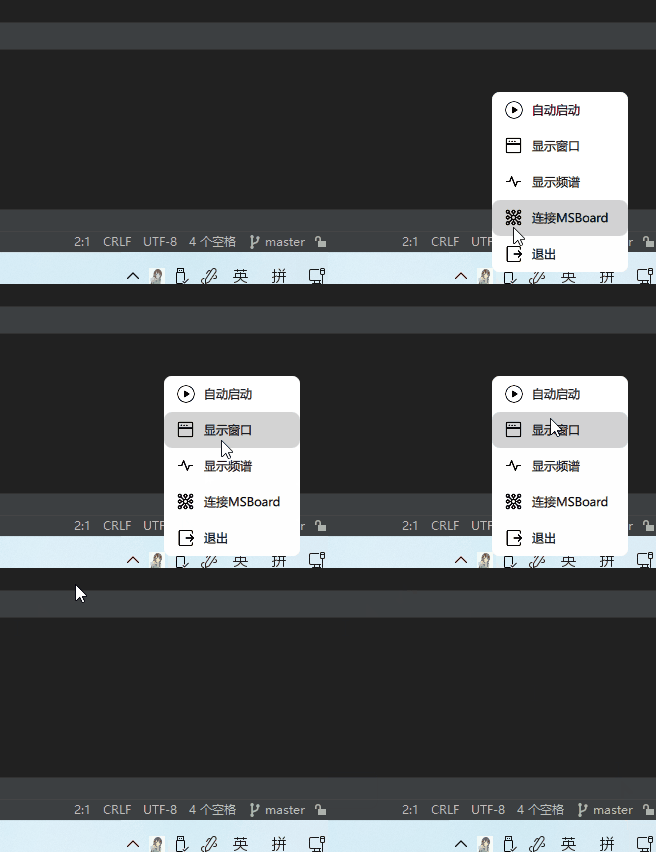
那既然没法用了。。首先就是Google一下。然后发现可能是官方的BUG??那既然是官方的BUG,那我们就绕开这个BUG换种思路走
解决思路
我们可以直接在托盘检测鼠标按键,如果为右键,那么我们创建一个新窗口,然后顺便可以将这个窗口美化,整的比较好看一些。但是有几个要考虑问题:
- 如何在全局获取到鼠标的位置,然后在当前的鼠标位置创建窗口
- 当窗口打开后,鼠标移开菜单区域之后,窗口怎么实现自动隐藏?
这期我们只是实现如何右键创建窗口,并且对窗口进行美化。
创建一个窗口
首先当然是创建一个窗口,然后隐藏任务栏和窗口栏,设置大小等。不多赘述
Window{
    id:root_window
    //便于外部的变量控制
    property int menu_x
    property int menu_y
    x:menu_x
    //这里为了让窗口左下角和鼠标对齐(默认左上角)
    y:menu_y - height
    width: 136
    height: 180
    flags:Qt.FramelessWindowsHint | Qt.ToolTip
    modality: Qt.NonModal
    color: "transparent"
}
创建一些信号
然后我们创建一些信号(根据自己菜单数目,我这里一共四个控件需要发射信号),表示我们当前鼠标点击过了
//定义信号,发射给调用控件
signal sws_click
signal sw_click
signal sf_click
signal cm_click
填充控件
接下来就是给窗口填充控件了,这里我就拿一个Rectangle举例,我的项目一共五个,为了避免篇幅过长,拿一个举例,其他类似
//PageMenu.qml
//一个大的背景Rectangle
Rectangle{
    radius:8
    width:root_window.width
    height:root_window.height

    Column{
      anchors.centerIn: parent

      RoundButton{
	  id: start_with_system
	  width:root_window.width
	  height:36
	  radius:8
	  checkable:true
	  background:
	  Rectangle{
	      id:sws_bk
	      radius:8
	      color: start_with_system.checked ? "whitesmoke" :
	      (start_with_system.hovered ? "lightgrey" :
	       "white")
	      Image{
		  id:sws_img
		  anchors.left:parent.left
		  anchors.verticalCenter: parent.verticalCenter
		  anchors.leftMargin:12
		  smooth:true
		  width:20
		  height:20
		  source:"/icon/start.svg"
	      }
	      Text{
		  anchors.left:sws_img.left
		  anchors.verticalCenter: parent.verticalCenter
		  anchors.leftMargin:28
		  text:"自动启动"
		  font.pointSize:9
	      }
	  }
		      //发送信号(上面定义过)
	  onClicked:root_window.sws_click()
      }
    }
}
实现右键唤出这个窗口
接下来就是要在另一个文件里面来实现右键唤出这个窗口。全项目请看:
//media_state_T.qml
SystemTrayIcon{
    id:system_icon
    visible: true
    icon.source: "qrc:/album.jpg"
    tooltip:"MediaStateT"

    onActivated:
    //reason是SystemTrayIcon固有属性,不同数值对应不同的按键事件
    //来源:https://gist.github.com/kviktor/
    function(reason){
      //双击,单机,2,3,右键1
      if(reason === 2 || reason === 3){
	  //显示窗口
	  pop_window.showWindow()
      }else if(reason === 1){
	  //定义过的槽函数,执行操作后,然后发射到get_mouse_cursor
	  mt_info_get.get_mouse_cursor()
      }
    }
}
下面的代码可能会看不懂,这里解释一下。获取鼠标的坐标需要在C++调用 GetDesktopWindow这个WindowAPI,然后发送信号到QML。信号名称为 get_mouse_cursor, scale为缩放率,为了适配高分屏。后面的文章会讲到
//media_state_T.qml(主QML)
onGot_mouse_cursor:
      //Qt6用法。qt5可忽略function
    function(x,y,scale){
      menu_right.menu_x = x / scale
      menu_right.menu_y = y / scale
      menu_right.show()
      //展现在最上层
      menu_right.raise()
    }
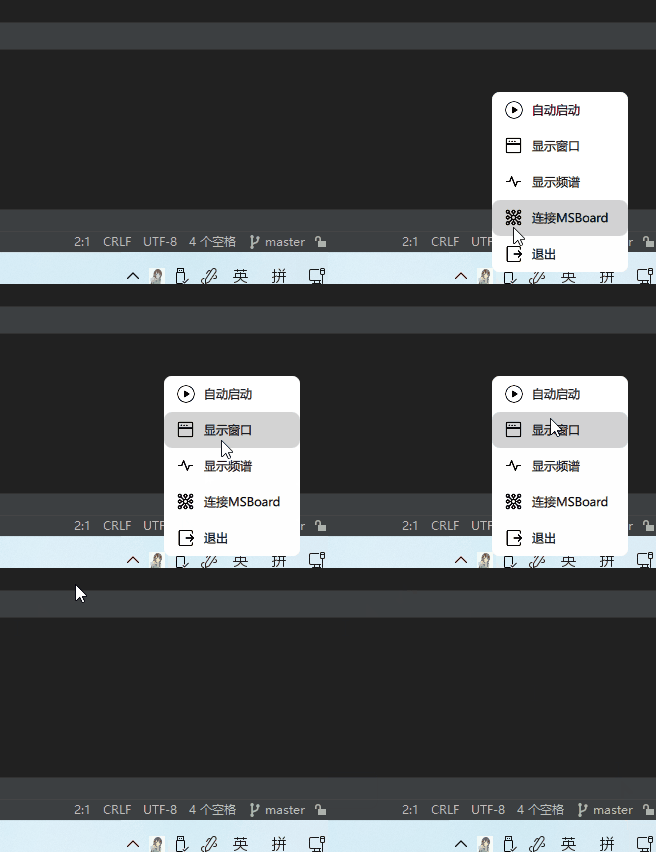
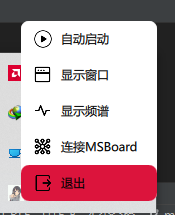
来看看效果:
参考
自定义托盘右键菜单自动隐藏
上节我们创建了个比较现代简约风的托盘右键菜单,这节我们来讲讲怎么实现其自动关闭。
问题
毋庸置疑,我们需要一个Timer,然后比较关键的来了,我们怎么知道我们的鼠标放没放在窗口上?MouseArea?并不是!这家伙只能在最上层的时候被识别到。那每个控件都放个MouseArea不就可以实现鼠标的位置检测了?确实可以。但是比PPT还卡的应用,你用吗?
解决思路
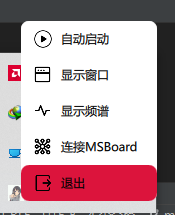
临机一动,我的五个控件都是由Button控件组成的,Button控件有一个叫 hovered的属性,可以返回鼠标有没有在按钮上,那么就没必要检测鼠标的位置了,简单又方便
Timer{
      id:close_timer
      interval:800
      repeat:true
      running:true
      onTriggered:{
	  root_window.show()
	  close_timer.restart()
	  //检测鼠标是不是在Button上
	  if(!start_with_system.hovered && !showWindow.hovered &&
	      !showFrequency.hovered && !connectMSBoard.hovered &&
	      !exit.hovered){
		  root_window.close()
	  }
      }
    }
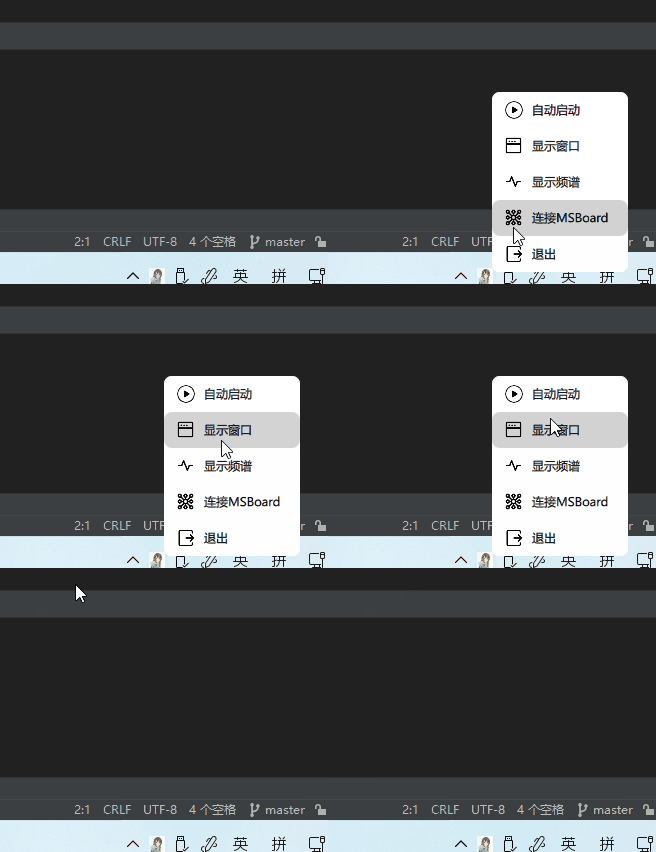
效果展示
参考
解决开启屏幕缩放获取鼠标位置不正确问题
上节我们构建了一个较为完整的右键托盘菜单,但当我将软件移动到高分辨率屏幕的时候,出现了一些问题
问题
Windows对于高分辨率屏幕默认开启了屏幕缩放。如下:
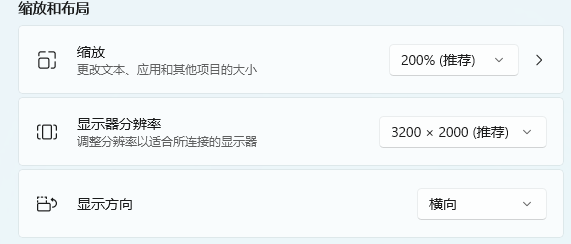
Windows对于鼠标坐标的采集有好几个API,这里就拿GetDesktopWindow来说这个 API获取的是鼠标在真实分辨率上的位置。也就是未经过缩放的。
但是程序在创建窗口的时候使用的是缩放后的分辨率大小。如果直接调用此API,那么在开启缩放的屏幕上就会出现窗口偏移的情况,鼠标位置越靠右下角偏移的位置也就会越大。
问题解决
这时候就需要另一个API了,GetDpiForWindow这个函数会返回当前DPI,在 Windows中,DPI和缩放系数有一个对应表:
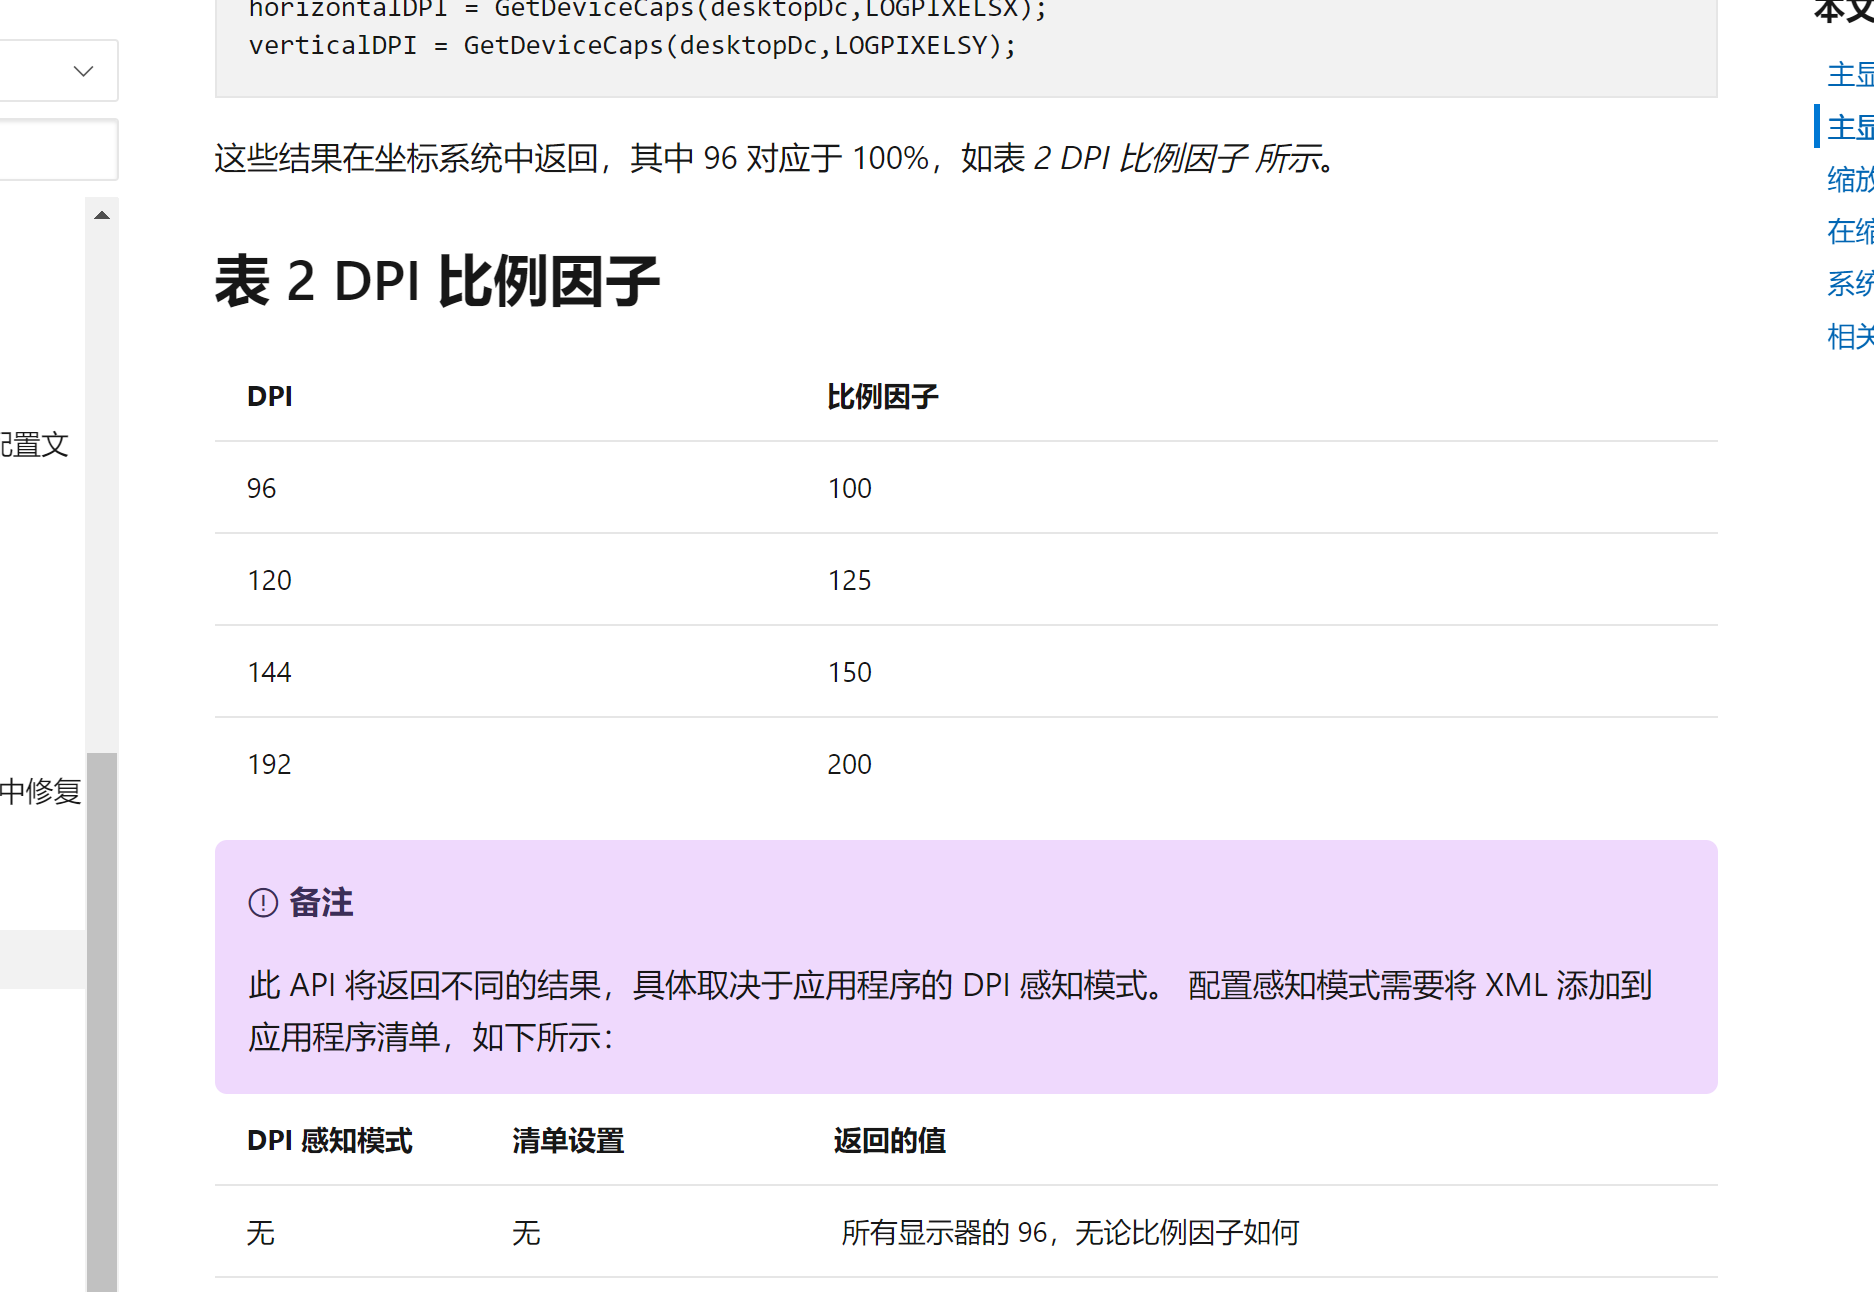
然后我们对其进行实现:
oid MtMediaInfo::get_mouse_cursor() {
    //参考:https://docs.microsoft.com/zh-cn/windows-hardware/manufacture/desktop/dpi-related-apis-and-registry-settings?view=windows-11
    //https://blog.csdn.net/qq_21743659/article/details/114312564
    POINT p;
    GetCursorPos(&p);
    HWND hd = GetDesktopWindow();
    int zoom = GetDpiForWindow(hd);
    float scale = 0;
    switch(zoom){
      //百分比对应DPI
      case 96:
	  scale = 1.0;
	  break;
      case 120:
	  scale = 1.25;
	  break;
      case 150:
	  scale = 1.5;
	  break;
      case 192:
	  scale = 2.0;
	  break;
      default:
	  scale = 1;
	  break;
    }

    emit got_mouse_cursor(p.x, p.y, scale);
}
这里的scale就是上次讲过的为了适配高分屏的scale了。。
那么知道缩放系数,我们自然可以求得窗口创建的时候所需要的坐标了。
onGot_mouse_cursor:
//Qt6用法。qt5可忽略function
function(x,y,scale){
    //这里就是转换后的坐标,直接带入窗口x,y即可
    //C++或者其他语言同理。
    menu_right.menu_x = x / scale
    menu_right.menu_y = y / scale

    menu_right.show()
    //展现在最上层
    menu_right.raise()
}
以上,解决!
看看1080P和3.2K屏幕对比的效果:矢量图在高分辨率表现就是优秀啊
参考
QML动态柱状图
上节我们解决了高分辨鼠标坐标偏移的问题,这次我们来整个动态柱状图来实现实时音频频谱显示
效果展示
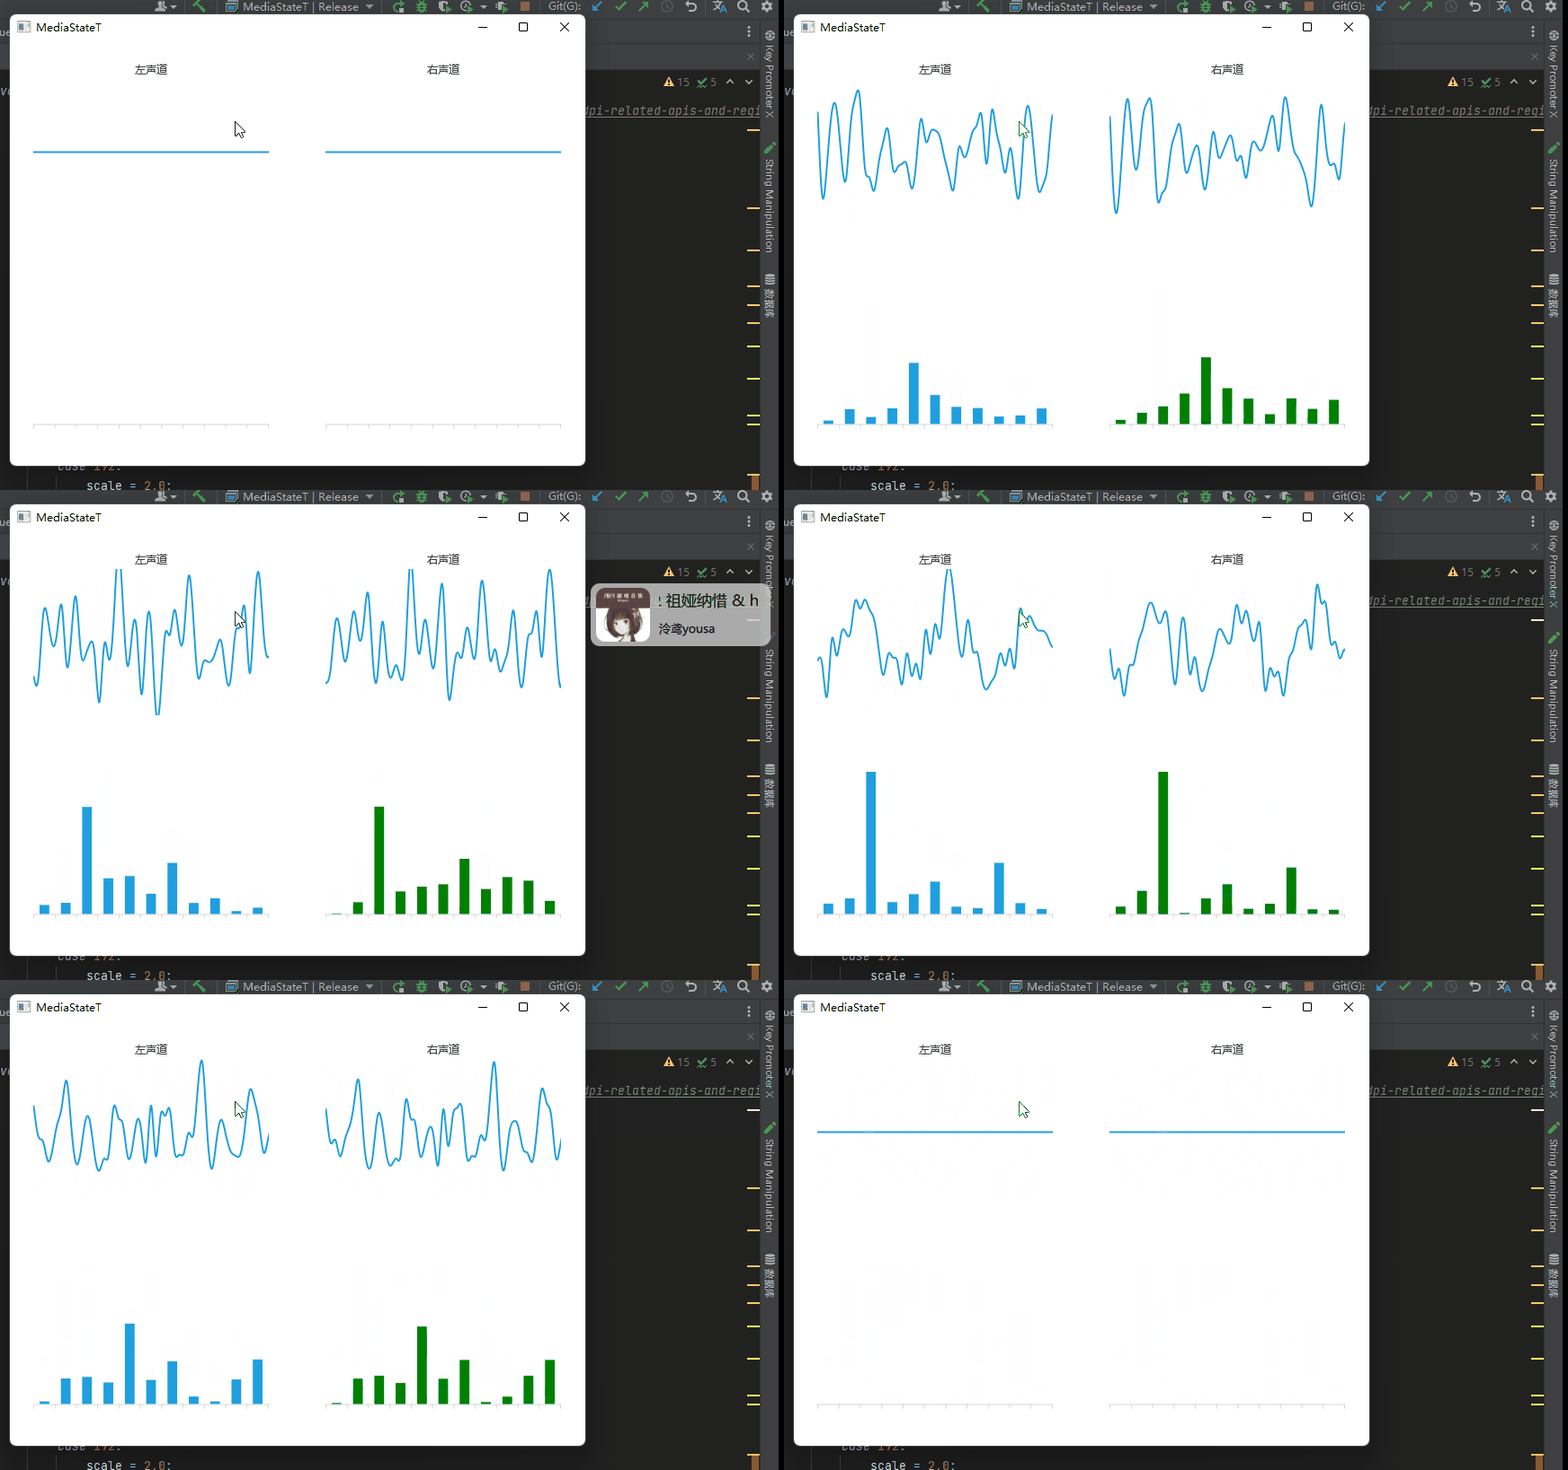
效果感觉还行?将就吧,到时候抽时间再美化美化。。而且似乎得上个多线程。。
实现讲解
这里一共两个声道,我们就讲一个声道,剩下那个一样的实现。先创建一个基本构架。
ChartView{
    id:left_bar
    //            title: qsTr("左声道")
    Layout.minimumWidth:320
    Layout.minimumHeight:240
    antialiasing:true
    legend.visible:false

    BarCategoryAxis{
      id:left_bar_value_X
      labelsVisible:false
      gridVisible:false
      //这里添加下标,到时候隐藏,不然到时候进行数据替换没法替换,数量一定要和想要显示的个数一致
      categories: ["0", "1", "2", "3", "4", "5", "6", "7", "8", "9", "10"]
    }

    ValueAxis{
      id:left_bar_value_Y
      visible:false
      min:0
      max:1000
    }

    BarSeries{
      axisX:left_bar_value_X
      axisY:left_bar_value_Y

      BarSet {
	  id:bar1
	  label: "Bob";
	  //这里对应数值,到时候隐藏,不然到时候进行数据替换没法替换,数量一定要和想要显示的个数一致
	  values: [2, 2, 3, 4, 5, 6, 7, 8, 9, 10, 11]
      }
    }
}
具体数据替换:
> 这里摘取部分代码,相较于项目源代码删除了折线图部分和柱状图右声道部分,避免大量代码影响观感,只是为了大家尽可能好理解,全部代码请看项目
这里解释一些必要的东西:
- 替换数据需要YourBarID.replace(index, value)函数
- freInterFace.data_vector 顾名思义就是我存放数据的地方,替换成自己的数据就可以了。
- 我的柱状图一共十个柱,。所以j<=10,具体情况自行替换
- bar1就是左声道的柱状图id,具体情况自行替换
Timer{
    id:update_value
    repeat:true
    running:true
    interval:45
    onTriggered: {
      //检测窗口是否处于活跃状态
      if(root_window.active === true){
	      for(var j = 0;j <= 10;j++){
		  bar1.replace(j, freInterface.data_vector[3][j+1])
	      }
	  }
      }
    }
}
唠嗑:这个教程我感觉写到这里就快接近尾声了,往后无非就是一些BUG的修复和一些小功能的添加了(还有MediaStateBoard的那个板子的实现,不过就和Qt 无关了)。当然,添加有趣的功能也会再出个文章啥的。这次的文章主要是写项目的过程中遇到的一些坑或者是比较好的经验分享。写这个项目完全就是看着网易云那个MACOS弹窗真心不错,就想模仿一个,另外再添加点新功能。Qt6是个刚出的新玩意,网上的教程也是零星的几篇。很多平台的教程都是直接自动copy来的,相信各位也看得出来。。
参考
QML创建一个漂亮的音乐显示弹窗
前言
以前的弹窗效果有些看腻了,这次更新下界面。
效果展示
以前界面:

目前界面:

窗口绘制:
- PopWindow使用Loader控件进行了模块化,非常好用,可以随便在Loader里面添加控件
> 需要注意的是,添加到Loader中的控件id不能被外部所访问,所以建议在外部先加载好控件然后传递到Loader
- 直接在source_component添加Conponent控件即可
> 需要注意的是Component只能有一个控件,所以建议先创建一个大的Rectangle 然后再在Rectangle里面创建其他控件,最后传递Component也就传递了 Rectangle及其整个界面
代码参考
> 这次只是相较于上次添加了一些组件和虚化效果,还有主函数的调用逻辑都进行了更新。
整体的代码不是很难,必要的注释都写在代码里了。需要注意的是:
- PopWindow.qml 的Window属性的x y 可以被外部调用的时候被覆盖
- 窗口的大小根据Loader里面content_loader的内容大小改变
- sign这个变量只是一个标志,为了防止动画被多次执行。
PopWindow.qml
import QtQuick
import QtQuick.Controls
import QtQuick.Window

Window{
    id: pop_window
    visible: true
    visibility: Window.Windowed
    color: "transparent"
    // 透明度
    opacity: 0
    // 取消边框
    flags:Qt.FramelessWindowsHint | Qt.ToolTip
    // 设置为非模态
    modality: Qt.NonModal
    //设置初始位置(外部设置会覆盖此设置)
    x: Screen.width - content_loader.width
    y: 100
    //根据Loader设置大小
    width: content_loader.width
    height: content_loader.height

    MouseArea{
      id:content_mouse
      anchors.fill: parent
      hoverEnabled: true
    }

    // 设置出现后显示时间的计时器
    Timer{
      id:show_timer
      interval: 2500
      repeat: true
      onTriggered:{
	  //这个if实现了鼠标悬停保留窗口的效果
	  if(!loader_mouse.containsMouse){
	      hideWindow();
	  }
      }
    }

    //绘制图形的Loader,供外部使用
    property alias source_component:content_loader.sourceComponent
    Loader{
      id:content_loader
      MouseArea{
	  id:loader_mouse
	  anchors.fill:parent
	  hoverEnabled:true
      }
    }

//---------------------------动画部分开始-------------------
    //设置出现显示动画相对于设置的x值的偏移位置,这里变量外部进行了设置
    property int x_offset: 0
    property int x_origin: 0
    //设置sign标志,防止多次showWindow调用造成多次动画显示
    property int sign: 0
    ParallelAnimation{
      id: show_anim
      // 透明度动画
      PropertyAnimation{
	  target:pop_window
	  property: "opacity"
	  easing.type: Easing.InQuart
	  from:pop_window.opacity
	  to: 1
	  duration:350
      }
      // 位置移动动画
      PropertyAnimation{
	  target:pop_window
	  property: "x"
	  easing.type: Easing.OutBounce
	  //从当前值开始移动
	  from: pop_window.x
	  to: Screen.width - content_loader.width - x_offset
	  duration:800
      }
      // 大小缩放动画
      PropertyAnimation{
	  target:pop_window
	  property: "width"
	  easing.type: Easing.OutCirc
	  //从当前值开始移动
	  from: 0
	  to: content_loader.width
	  duration:200
      }
      // 大小缩放动画
      PropertyAnimation{
	  target:pop_window
	  property: "height"
	  easing.type: Easing.OutCirc
	  //从当前值开始移动
	  from: 0
	  to: content_loader.height
	  duration:200
      }

      onStarted:{
	  pop_window.show()
      }
      //出现动画结束信号
      onFinished:{
	  show_timer.restart()
      }
    }
    //设置关闭显示动画
    ParallelAnimation{
      id: hide_anim
      // 透明度动画
      PropertyAnimation{
	  target:pop_window
	  property: "opacity"
	  easing.type: Easing.OutCubic
	  from:pop_window.opacity
	  to: 0
	  duration:800
      }
      //位置移动动画
      PropertyAnimation{
	  target:pop_window
	  property: "x"
	  easing.type: Easing.InExpo
	  //从当前值开始移动
	  from: pop_window.x
	  to: x_origin
	  duration:800
      }
      //大小缩放动画
      PropertyAnimation{
	  target:pop_window
	  property: "width"
	  easing.type: Easing.InQuint
	  //从当前值开始移动
	  from: content_loader.width + 10
	  to: 0
	  duration:1000
      }
      //大小缩放动画
      PropertyAnimation{
	  target:pop_window
	  property: "height"
	  easing.type: Easing.InQuint
	  //从当前值开始移动
	  from: content_loader.height + 10
	  to: 0
	  duration:1000
      }
      //结束动画结束之后停止定时器
      onFinished:{
	  show_timer.stop()
      }
    }

    //显示弹窗
    function showWindow(){
      if(sign === 0){
	  hide_anim.stop()
	  show_anim.start()
	  sign = 1
      }
    }

    //隐藏弹窗
    function hideWindow(){
      if(sign === 1){
	  show_anim.stop()
	  hide_anim.start()
	  sign = 0
      }
    }
//---------------------------动画部分结束-------------------
}
调用: media_stateT.qml
import QtQuick
import QtQuick.Controls
import QtQuick.Window
import Qt5Compat.GraphicalEffects
import Qt.labs.platform

import qt.txwh.MT_info_get 1.0

Item{
    //绘制窗口,然后传到PopWindow模块的Loader里
    Component{
      id:window_draw

      Rectangle{
	  id:bk_rectangle
	  width:200
	  height:70
	  radius:10
	  color: Qt.rgba(0.8,0.8,0.8,0.95)

	  Image{
	      id:img_background
	      width:bk_rectangle.width - 40
	      height:bk_rectangle.height - 16
	      source:"/icon/MtIcon.jpg"
	      smooth: true
	      mipmap:true
	      cache:false
	      visible:false
	      fillMode: Image.PreserveAspectCrop
	      anchors.verticalCenter: parent.verticalCenter
	      anchors.horizontalCenter : parent.horizontalCenter
	      anchors.right: parent.right
	      anchors.rightMargin: 6
	  }

	  Rectangle {
	      id: img_bck_mask
	      width: img_background.width
	      height: img_background.height
	      radius: 10
	      color: "red"
	      visible: false
	  }

	  OpacityMask {
	      anchors.fill: img_background
	      source: img_background
	      maskSource: img_bck_mask
	  }

	  FastBlur {
	      anchors.fill: img_background
	      source: img_background
	      radius: 32
	      transparentBorder:true
	  }

	  Image {
	      id: img
	      width: 60
	      height: 60
	      anchors.verticalCenter: parent.verticalCenter
	      anchors.left: parent.left
	      anchors.leftMargin:6
	      source: "/icon/MtIcon.jpg"
	      sourceSize.width:1024
	      sourceSize.height:1024
	      smooth: true
	      mipmap:true
	      visible: false
	      cache:false
	  }

	  Rectangle {
	      id: img_mask
	      width: img.width
	      height: img.height
	      radius: 10
	      color: "red"
	      visible: false
	  }

	  OpacityMask {
	      anchors.fill: img
	      source: img
	      maskSource: img_mask
	  }

	  TextScroll{
	      id:music_name_label
	      width:110
	      anchors.verticalCenter: parent.verticalCenter
	      anchors.verticalCenterOffset: -16
	      anchors.left:img.right
	      anchors.leftMargin:10
	      fontPixelSize:17
	      text:qsTr("Music Name")
	  }

	  TextScroll{
	      id:player_name_label
	      width:110
	      anchors.verticalCenter: parent.verticalCenter
	      anchors.verticalCenterOffset: 16
	      anchors.left:img.right
	      anchors.leftMargin:10
	      fontPixelSize:13
	      text:qsTr("Player")
	  }

	  //获取信息类,这是一个C++类
	  MT_info_get{
	      id:mt_info_get
	      //存储上一次的history时间信息,用string是为了防止数字过大造成溢出
	      property string last_file_time;
	      //这边从C++传来的值进行赋值的时候需要写function()
	      //这里QT6和Qt5的Quick有些不同
	      //这样子加个function可以很明显的标识这是由emit传来的signal的参数
	      //详细链接可以参考这个: https://www.direktembedded.com/qt5-to-qt6-qml-pyside-porting/
	      onNe_file_time_got:
		  function(temp_time){
		      if(temp_time != last_file_time){
			  //获取信息
			  mt_info_get.music_info_get()
			  mt_info_get.player_info_get()
			  mt_info_get.img_download()
			  //显示窗口
			  pop_window.showWindow()
			  last_file_time = temp_time
		  }
	      }

	      onMusic_info_got:
		  function(music_name){
		      music_name_label.text = music_name
		      //重新获取图片
		      mt_info_get.img_download()
		      //由于QtImage存在缓存机制,需要cache:false并且先置空路径再设置路径才会加载图片,不改变路径直接调用上次的缓存
		      img.source = ""
		      img.source = "file:./album.jpg"
		      img_background.source = ""
		      img_background.source = "file:./album.jpg"
		  }

	      onPlayer_info_got:
		  function(player_name){
		      player_name_label.text = player_name
		  }

	      onAutostart_status:
		  function(value){
		      if (value){
			  menu_right.sws.checked = true
		      }else{
			  menu_right.sws.checked = false
		      }
		  }

	      onHot_key_activated:
		  function(value){
		      if(value === 1){
			  pop_window.showWindow()
		      }else if(value === 2){
			  mt_fre.showWindow()
		      }else if(value === 3){
			  mtBoardConnect.init();
			  menu_right.connectMSBoardState = true;
		      }
		  }

	      onGot_mouse_cursor:
		  //Qt6用法。qt5可忽略function
		  function(x,y,scale){
		      menu_right.menu_x = x / scale
		      menu_right.menu_y = y / scale
		      menu_right.show()
		      //展现在最上层
		      menu_right.raise()
		  }

	      //获取网易云音乐history的修改时间函数
	      function ne_file_time(){
		  mt_info_get.NE_file_time()
	      }
	  }

	  // 循环更新网易云歌曲等参数
	  Timer{
	      interval:500
	      repeat:true
	      running:true
	      onTriggered:{
		  mt_info_get.ne_file_time();
	      }
	  }

	  SystemTrayIcon{
	      id:system_icon
	      visible: true
	      icon.source: "qrc:/icon/MtIcon.jpg"
	      tooltip:"MediaStateT"

	      onActivated:
		  //reason是SystemTrayIcon固有属性,不同数值对应不同的按键事件
		  //来源:https://gist.github.com/kviktor/
		  function(reason){
		      //双击,单机,2,3,右键1
		      if(reason === 2 || reason === 3){
			  //显示窗口
			  pop_window.showWindow()
		      }else if(reason === 1){
			  //定义过的槽函数,执行操作后,然后发射到get_mouse_cursor
			  mt_info_get.get_mouse_cursor()
		      }
		  }
	  }

	  PageMenu{
	      id:menu_right

	      onSws_click:{
		  if(menu_right.sws.checked){
		      mt_info_get.create_sws()
		      // 再次进行状态检测确保添加成功
		      mt_info_get.check_start_with_system()
		  }else{
		      mt_info_get.remove_sws()
		      mt_info_get.check_start_with_system()
		  }
	      }

	      Component.onCompleted: mt_info_get.check_start_with_system()

	      onSw_click:{
		  pop_window.showWindow()
	      }

	      onSf_click:{
		  mt_fre.showWindow()
	      }
	  }
      }
    }

    PopWindow{
      id:pop_window
      // 设置初始位置,对PopWindow里面的x,y进行了覆盖
      x_offset: get_screen_pixel(0.005, Screen.width)
      x: get_screen_pixel(0.94, Screen.width) //设置0.94不设置1是为了防止不同缩放下屏幕边缘乱跳的问题
      y: get_screen_pixel(0.13, Screen.height)
      x_origin: get_screen_pixel(0.94, Screen.width)
      source_component:window_draw

      // 为了适应不同的屏幕,需要使用百分比表示
      function get_screen_pixel(percent, sum_pixel){
	  return percent * sum_pixel
      }
    }

    PageAudioFrequency{
      id:mt_fre
    }
}